FME for video processing—is it even possible? By integrating a few tools, I was able to use FME to make videos and display them in a web browser. This project started as a timelapse video of the new Safe office, and evolved into georeferenced satellite movies, GPS tracks interacting with videos, and beyond. Here’s how it’s done.
How It All Began
For me, it always begins as fun, not work. On a beautiful winter day, a Slack message in the “general” channel brought me a link to the camera facing the construction site where pretty soon the shiny new Safe Software office will open its doors to all Safers.
After some digging into the html behind the original url (http://184.68.143.58:2424/view/viewer_index.shtml?id=17039), I discovered an address that returns a simple JPEG image. We can easily retrieve images from web sites with HTTPCaller or ImageFetcher. With a workspace consisting of four transformers, living in FME Cloud and running on schedule every 10 minutes, I got a tool for accumulating the data from the camera.
For years, I used ImageMagick, which we can run using SystemCaller, for making animations. With the live camera, my collection quickly grew to thousands and tens of thousands of images—making a GIF file wasn’t a viable option anymore.
After a quick search, I discovered FFmpeg, an open-source tool for manipulating video and audio data. It looked like a perfect match to FME, the program for data manipulation.
Simple Video Manipulations
Assembling videos from images
Using the familiar technology explained in this knowledge base article, I quickly assembled a simple video of the progress at the construction site. The Safers reacted very vividly to the video, especially to the accumulating and retreating snow—we had a really rough winter last year.
With FME, we can enrich the original photos with some additional information taken from vector or raster data. For example, we can add a timestamp to each frame. Two transformers to perform such an overlay are VectorOnRasterOverlayer and MapnikRasterizer. My personal preference is, of course, the Mapnik transformer—it gives almost infinite possibilities to make beautiful maps and images.
Once the new images (or, to be more precise in the context of the blog, video frames) are ready, we can create a simple command in AttributeCreator and pass it to SystemCaller, which will make the video:
""ffmpeg.exe" -framerate 10 -i "C:LiveCamerasequenceimg_%5d.jpg"
                            -i "C:LiveCamerasoundItalian_Morning.mp3"
                            -y "C:LiveCameravideoNewOfficeConstruction.mp4""
Note, that the command line syntax is slightly different for other OS supported by FME. For example, Unix-based OS do not need quotation marks around the command. We tested FFmpeg on Linux in the FME Cloud environment. Mac OS still awaits its first testers.
This is how the actually executed command line looks, but of course, within AttributeCreator, we can use attributes and workspace parameters to avoid any hard-coded paths or options.
In the command above, we set the framerate to 10 frames per second, which may be pretty low for a real video with dynamic scenes, but works quite well in this situation, specify the input (-i)—the folder with the source video frames and the soundtrack. “-y” tells to overwrite any previous outputs with the same name.The last name specifies the output video.
The result is a video file, we can play it with any video player:
Georeferenced videos
The next thing that caught my attention and practically forced me into the world of video transformations, was the release of the new version of Leaflet, a lightweight Javascript library for making interactive web maps. Starting with version 1.1, Leaflet allows video overlays on the maps. My first and simplest idea was to put the video of the construction site on the map—at the location of the new office:
The amount of Javascript code required for a video overlay is surprisingly small – we specify the bounds of the video in lat/long and add the video overlay to a previously declared map:
var bounds = L.latLngBounds([[ 37.72, -121.10], [ 37.76, -121.03]]);
var videoOverlay = L.videoOverlay("NewOffice.mp4", bounds, {opacity:1}).addTo(map);
Check the standalone HTML.
The video overlay worked pleasantly well—while we zoom in or out, or pan, and the video keeps playing. The true power of a video on a map, however, really shows itself when the video is a map, too!
What can be better for a geospatial video than a frequently updated satellite imagery? Planet Labs Inc. with its constellation of almost 200 satellites is an excellent source of images with very high revisit rates, and FME 2017 provides a very easy access to this data through its Planet reader.
The advantages of using FME for making videos are clear – FME is aware of coordinate systems, we can take several data sources in different projections, bring them together, combine into separate raster frames, which we then assemble into a video as explained above. The coordinate system challenges can be quite serious sometimes.
For example, the LeafletJS library requires the video bounds specified in Latitude/Longitude. The web tiles underneath Leaflet (or google maps and most other web mapping systems) are in Spherical Mercator. Planet data comes in UTM. Many video players can play only standard size videos, such as 1920×1080 or 720×480. So, if we would like not only place our video on a map, but also play it with different video players, which might be not that flexible, we must consider the latitude of our source frames and calculate the sizes of the source images accordingly—narrower frames at the equator, wider frames in polar regions.
Check the standalone HTML.
Smooth transitions between images in the video
The power of FME allows making very nice visual effects such as smooth transitions. Compare the following two videos, an early test on the left, and its further development on the right, where I generated the intermediate frames between the downloaded images:
| Version 1 | Version 2 |
In order to generate intermediate frames, I use Alpha band, the raster band that represents transparency. Between each pair of the consecutive images, I generate n copies of each, gradually reduce/increase their transparency with RasterExpressionEvaluator and mosaic the pairs with RasterMosaicker using “Composite Using Alpha Band” mode.
| Transparency, % | ||||||||||
| Frame 1 | Intermediate frames | Frame 2 | ||||||||
| 0 | 10 | 20 | 30 | 40 | 50 | 60 | 70 | 80 | 90 | 100 |
| 100 | 90 | 80 | 70 | 60 | 50 | 40 | 30 | 20 | 10 | 0 |
Download smooth transitions template. Use the workspace from “Assembling videos from images” for making a video from the generated frames.
Disassembling videos into images
What if we already have a video and would like to make some modifications to it? For example, we may need to add a logo or a map overlay, perform some detection analysis, or, just for a fun home project, reverse a video and learn how to fly?
Here is an example of a command that extracts separate frames from the video:
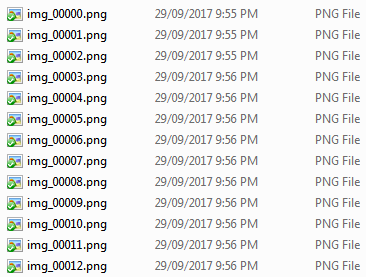
""ffmpeg.exe" -i "C:VideovideosDriveToWork.mp4" -vf fps=1/1 "C:Videoframesimg_%05d.png""
The command tells FFmpeg to use fps video filter (-vf fps), and its parameter 1/1 orders to extract one image per second. The img_%05d.png syntax will force the sequential numbering of the output files adding leading zeroes so that the names always consist of 5 digits, the files will have PNG extension:
We can bring these images back to FME with FeatureReader, and, knowing the video creation date and time, calculate time for each frame and use it, for example, to match timestamps in GPS tracks.
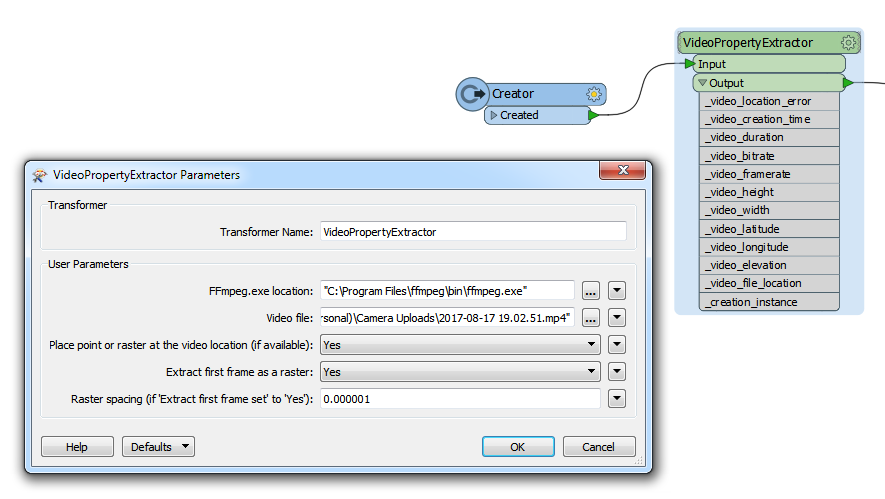
Video properties
Many video scenarios, especially those where we join the footage with GPS data, require the knowledge of several video properties such as video creation time, frame rate, and the length of the video. Among other useful properties are video dimensions, geographic location (if available), and bitrate.
FFmpeg allows extracting such information with the following command:
""ffmpeg.exe" -i "C:VideosHorseRiding.mp4""
For FME, I packaged it into a custom transformer VideoPropertyExtractor, which adds several attributes representing video properties to a feature passing through it.
Advanced video operations
With some additional information such as GPS track accompanying the video, it becomes possible to create very interesting scenarios. For example, we can create a web page, where a video interacts with a map. We can clip video fragments using areas of interest over the GPS track from a drone carrying a video camera. Before going through these scenarios, let’s talk first about the video coordinate systems.
Video coordinate systems
One video coordinate system is similar to a simple two-dimensional pixel-based Cartesian coordinate system of an image. We use it to alter the video frames—knowing the dimensions of a video frame, we can place an object on it. If we assemble a video from images made from spatial data, we also can use a projected coordinate system before saving the frames and final video assembly.
Each video also has a one-dimensional coordinate system, which allows addressing different parts of the video—time. The video time is measured from 0 to its full length, and usually shown for our convenience in hours, minutes, and seconds (check any youtube video), but measured in seconds and fractions of a second behind the scenes.
This coordinate system can be related to the real time. For example, when we start playing a 15-minutes long video at 9:03 pm, we know it will end at 9:18 pm. For our scenarios, a more interesting time to connect to is the time when the video was created—the moment when we press the shutter button. We can match the creation timestamp to the timestamps on the points of a GPS track. From here, we can easily figure out how each second (or millisecond) of the video is related to the timeline of the GPS measurements, that is, to the timeline of the real world.
By knowing framerate, which is the number of frames shown in a video per second at the recorded speed, we can calculate the absolute time for each frame. This opens some exciting possibilities.
Placing extracted video frames on a map
So, imagine we have some footage along a route. It was a 20 minutes drive, our camera made the video with 60 fps, which makes 72,000 images. We don’t need that many—we only need to see what was happening along the route, and one image every 1 seconds, or maybe, every 20 seconds is enough, but we want to know where each particular video frame was taken. Based on the technique described above, we can calculate the location for each frame and place a point or an image on a map:
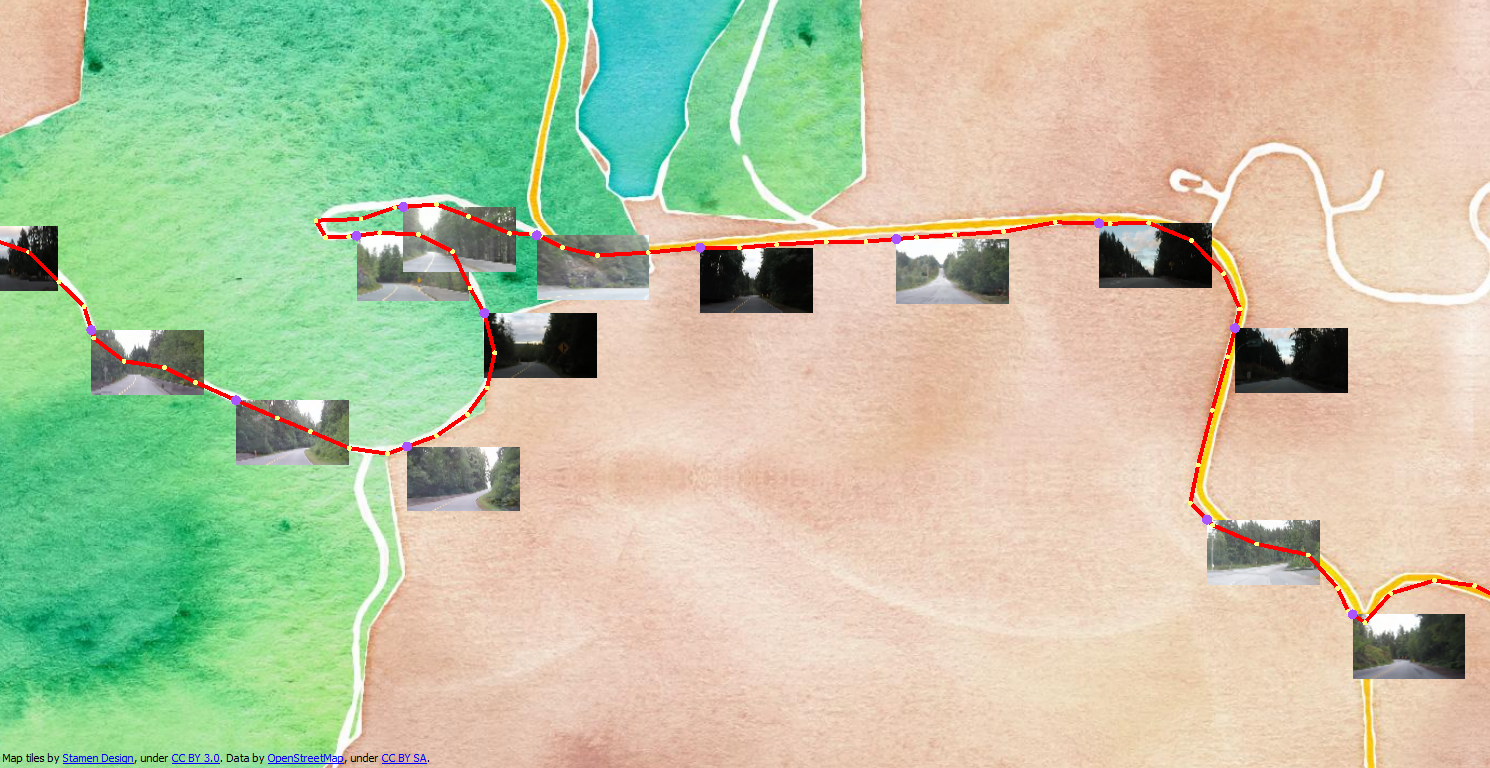
Download the template. The video due to its size is stored separately here (52 Mb).
Video enriched with additional information
Once a video is taken apart to frames, we can process them as normal rasters, which means, we can resample them, apply per-band operations, overlay vector data and mosaic with other raster files.
Using all the powers coming with FME – processing GPS tracks, integrating online services such as Google Maps, applying MapnikRasterizer for making raster, we can create really rich video frames and combine them back to a video.
The workspace that creates the video above uses the techniques shown in other examples and not included into this blog.
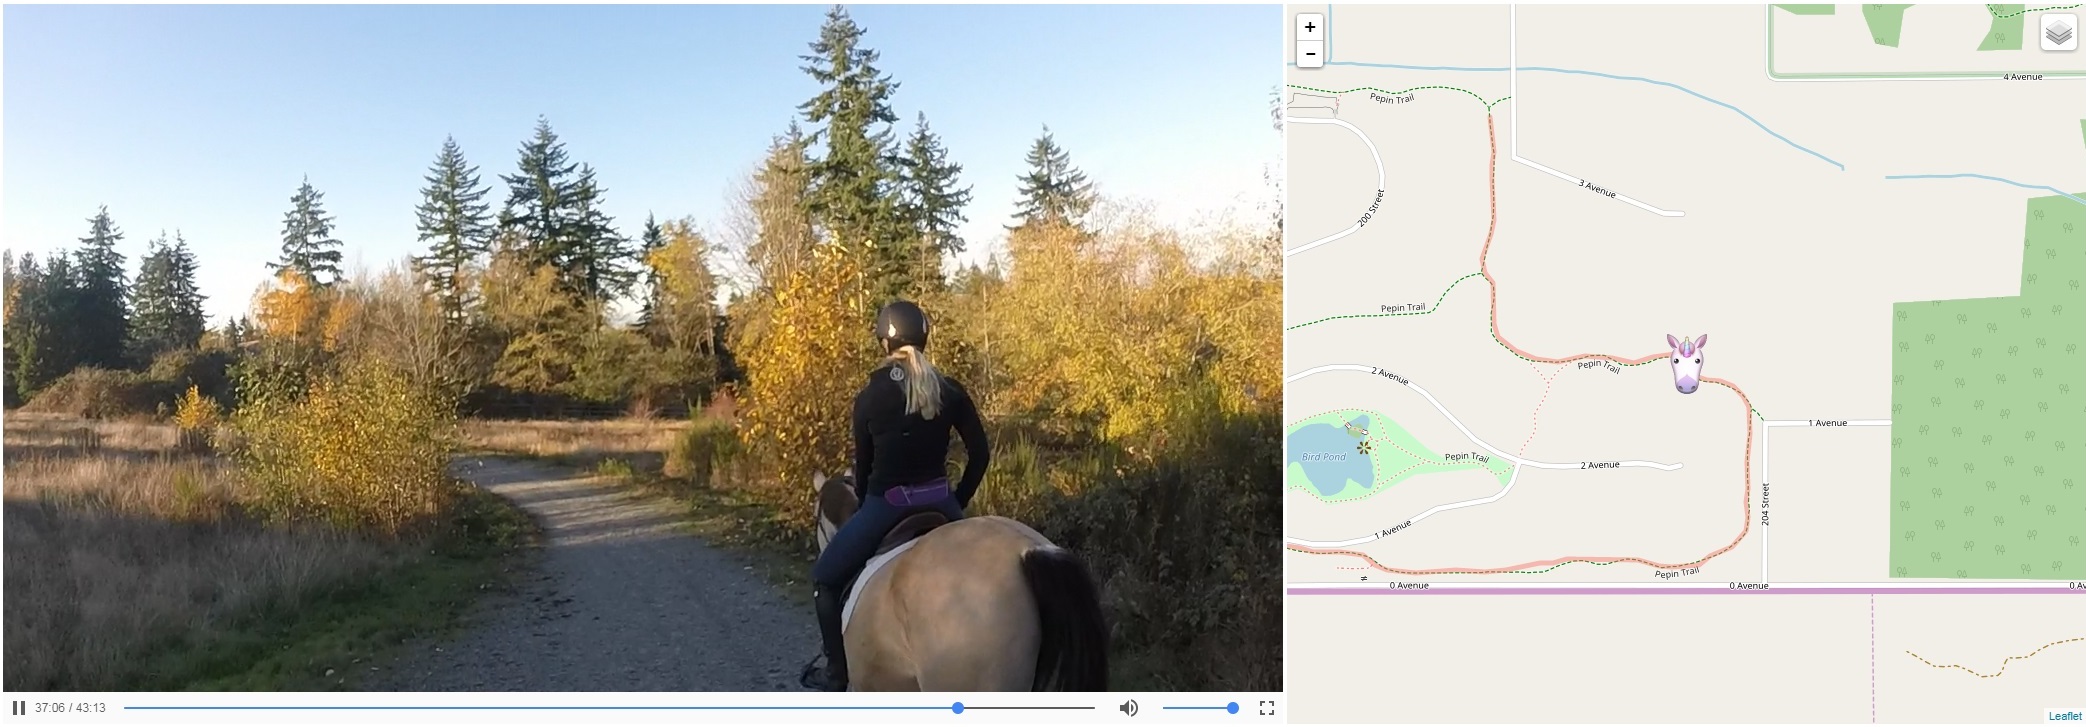
Interactions between video and maps
HTML 5 standard supported by all modern browsers, allows embedding videos into web pages. With the Javascript interface, we can get the current time of the playing video in seconds, or we can set it, that is, jump to a certain position (or time) within the video.
When we bring together both the GPS track time and the video time to the same timeline, we can go back and forth between coordinates on Earth and the time on the video.
Jumping to a new position on the video immediately causes change in the marker’s position on the map. Clicking anywhere on the track moves the video playback to the respective time.
Download the template. The video due to its size is stored separately here (820 Mb).
Play with the results on this page (no need to download anything).
Video clipping based on spatial overlay
Imagine we have some lengthy footage along a GPS track, but we are only interested in certain areas along the track.
Based on timestamps on points making up the GPS track, and by matching the video timeline to the GPS timeline, we can calculate the absolute and the relative time along the video timeline when we entered an area of interest and then when we left it. Knowing these two value, we can easily clip out the desired portions of the video.
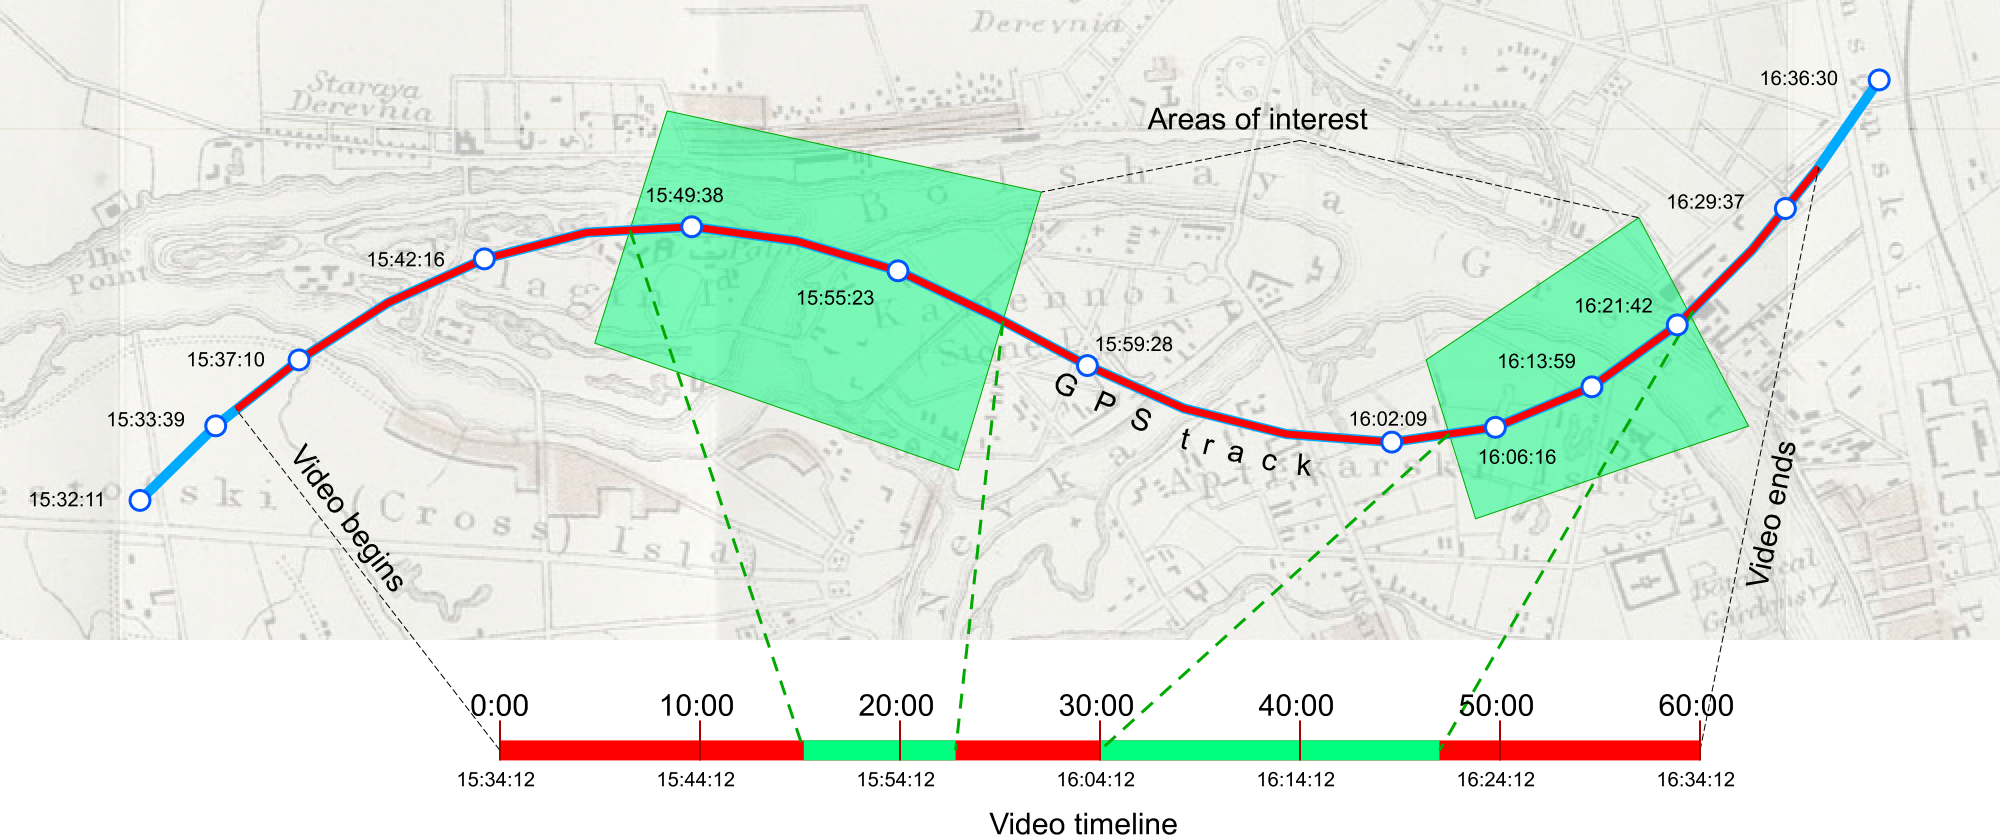
Download the template. The video due to its size is stored separately here (284 Mb).
What is next?
What are we going to do next—I as a Safer and the company as a whole? This is what we would like to hear from you!
I certainly can add a few more video custom transformers and make a few more video demos.
Here is a list of transformer ideas I have on my “would be nice to-do” list. Some of them are implemented as workspaces you can find on this page!
- VideoSplitter
- VideoClipper
- VideoFrameExtractor
- VideoCombiner
- VideoThinner
- VideoResampler
- VectorRasterOnVideoOverlayer
- VideoReverser
- VideoFrameSubsetter
- VideoExpressionEvaluator
- VideoRotator
The main question is, however, do you need video processing in FME? If yes, what should FME be able to do with videos? We certainly don’t want to build a replacement to professional video editors, we rather see FME adding the power of integration, the advantages of being spatially aware, and flexibility of automation.
What video formats and transformations would you use in a video-enabled FME? What are your video scenarios? Please let us know!
Note. All the workspaces in this blog are experimental. They didn’t go through a rigorous testing process, which we use for standard FME tools. If you experience any problems with them, feel free to contact me at dmitri@safe.com or have fun yourself – make your own video-processing tools!

Dmitri Bagh
Dmitri is the scenario creation expert at Safe Software, which means he spends his days playing with FME and testing what amazing things it can do.